networking-intelligence-icon
Step-by-step setup for routers, ATAs and IP Phones

Connecting a new router step-by-step:

  1. Wait for confirmation that your new service is live
  2. Unpack your new router and check all cables are included
  3. Make a note of any important settings from your old router
  4. Turn off and disconnect your old router
  5. Connect your new router:
    - SOGEA / SOADSL: connect to the master socket using the DSL cable
    - FTTP: connect to the Openreach ONT using the Ethernet cable
  6. Power on the router and wait a few minutes
  7. Connect your devices to the new router
    - You can connect an analogue phone or device into the ATA socket on the supplied router, and make and receive callsrouter-diagram-a 

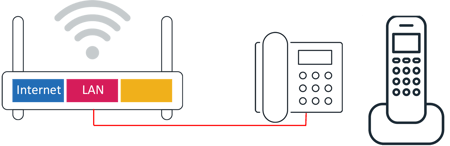
    - If you have purchased IP handset(s) these can be connected to the LAN (local area network) socket on the router, or via an Ethernet switch. Note: IP handsets will need power to operate.
    router-diagram-b
  8. Test internet, phones, card machines, CCTV and any other key business services
  9. If it does not connect, restart the router and contact Wavenet support on 0333 234 0011 if needed

If the upgrade is to FTTP

  • Make sure the Openreach ONT is already installed and powered on
  • Connect an Ethernet cable from the ONT port to the router’s WAN or internet port
  • Plug in the router power
  • Switch the router on
  • Wait for it to come online

Note: If you currently use any services that rely on your old analogue phone line, such as alarms, PDQ machines, lift lines, fax or legacy phone systems, these may need separate migration or reconfiguration as part of the upgrade. Please contact Wavenet if you require help and support.

Connecting an ATA step-by-step:

  1. Connect ATA to the router (Ethernet)
    Take an Ethernet (RJ45) cable. Plug one end into: The “Internet” / “WAN” / “Network” port on the ATA. Plug the other end into: A LAN port on your router. This is the key connection that gives the ATA internet access.
  2. Connect your phone to the ATA
    Use a standard phone cable (RJ11). Plug it into: The ATA port labelled “Phone 1” (or FXS port). Connect the other end to your analogue handset. The ATA converts your analogue phone signal into VoIP traffic.
  3. Power the ATA
    Plug in the power adapter. Connect it to the ATA’s DC power port. Turn it on. The ATA must be powered to function - it’s not just a passive adapter.
  4. Wait for it to boot
    The device will: obtain an IP address automatically. Register with the VoIP service. Typically takes 1–3 minutes to be ready.
  5. Test the connection
    Pick up the phone: you should hear a dial tone. Make a test call.

How do I connect my IP Phone or ATA to the internet?

You will need to connect your phone or adapter to your office internet network.

IP phones connect directly to an internet connection and do not require an adapter. Adapters are used to connect a regular analogue phone to your VoIP service.

Connecting an IP Phone to your internet network

Use the Ethernet cable that came with your IP phone to connect an available LAN port on your router to the LAN port on your phone. The label on that port will vary depending on the make or model of your phone.

Some IP phones offer an Ethernet pass-through option, allowing you to share a single Ethernet connection with your phone and another networked device. If your phone has this option, use another Ethernet cable to connect the network port on your other device to the PC port on your phone.

The first time you plug in your phone, it will take a few minutes and may reboot twice. Your phone is ready for use when you see its extension number displayed on the screen.

You can now make and receive calls.

Note: If your phone’s screen shows that the firmware is updating, do not power-cycle the phone, as you might corrupt the firmware and cause the phone to malfunction.

Connecting an ATA to your internet network

Use the Ethernet cable that came with your ATA to connect the LAN or internet port on your ATA to an available LAN port on your router.

Then use a standard RJ11 telephone cable to plug your touch-tone analogue phone into the PHONE 1 port of your ATA.

Once you have connected the ATA to your network, plug your ATA into a power source. It will take about two to three minutes to fully boot. Your ATA is ready for use when the LEDs on the ATA are illuminated and not blinking. If any of these LEDs do not light up, refer to your ATA’s user manual.

You can now make and receive calls.